

 buildblueprint.com
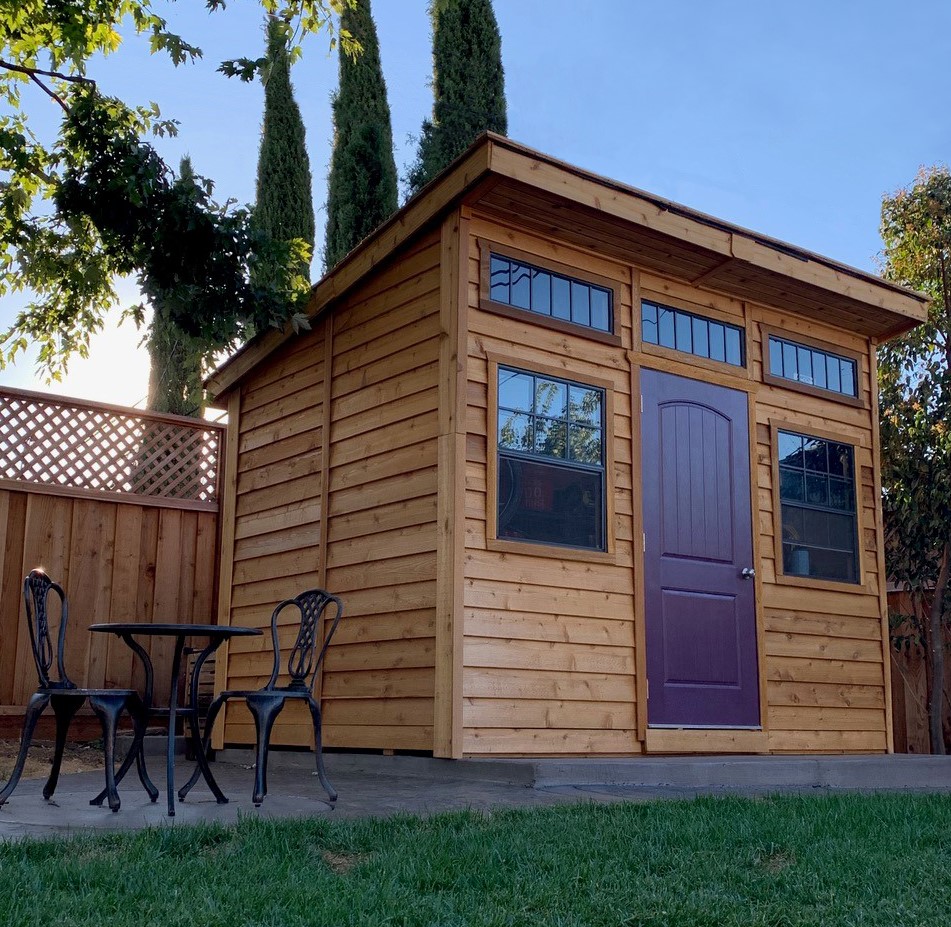
Introduction: Building a Lean-To Shed A lean-to shed is a versatile and cost-effective storage solution. This guide will walk you through building a simple lean-to shed, perfect for storing garden tools, firewood, or other outdoor equipment. Before starting, ensure you have all the necessary tools and materials. Planning is key to a successful project.
Materials List: Pressure-treated lumber for the foundation (4x4s or 6x6s) Framing lumber (2x4s) Sheathing (plywood or OSB) Roofing material (shingles, metal, or corrugated plastic) Siding (wood, vinyl, or metal) Fasteners (nails, screws, construction adhesive) Door and hardware Concrete mix (if pouring footings) Gravel or crushed stone (for drainage)
Tools List: Measuring tape Level Circular saw or hand saw Drill/driver Hammer Square Safety glasses Gloves Shovel Wheelbarrow (if mixing concrete) Ladder
Step 1: Prepare the Site Choose a location for your shed, ensuring it's relatively level and has good drainage. Clear the area of any vegetation, rocks, or debris. Determine the desired dimensions of your shed. A common size is 8ft wide x 12ft deep, but adjust as needed. If pouring concrete footings, dig holes below the frost line at each corner and at intervals along the perimeter. Pour concrete into the holes and allow to cure. 
Step 2: Build the Foundation If using pressure-treated lumber directly on the ground, create a perimeter foundation using the 4x4s or 6x6s. Ensure the foundation is level and square. Secure the corners with screws or bolts. If using concrete footings, attach the pressure-treated lumber to the footings using appropriate hardware (anchor bolts or brackets). Fill the area within the foundation with gravel or crushed stone for drainage. Compacting the gravel base is important for stability.
Step 3: Frame the Walls Cut the studs for the walls, keeping in mind that the back wall will be shorter than the front wall to create the lean-to slope. A typical slope is 1:12 (1 inch of drop for every 12 inches of run). Frame the walls using 2x4s, spacing the studs 16 inches on center. Construct the walls on the ground and then raise them into place. Secure the walls to the foundation using screws or nails. Ensure the walls are plumb and square before securing them permanently.
Step 4: Build the Roof Attach rafters to the top plates of the walls, maintaining the lean-to slope. Use 2x4s for the rafters and space them 24 inches on center. Overhang the rafters slightly beyond the walls for better weather protection. Install sheathing (plywood or OSB) over the rafters to create a solid roof deck. Secure the sheathing with nails or screws.
Step 5: Install Roofing and Siding Apply roofing underlayment over the sheathing to protect it from moisture. Install your chosen roofing material (shingles, metal, or corrugated plastic) according to the manufacturer's instructions. Install siding on the exterior walls, overlapping the pieces appropriately. Ensure the siding is securely fastened to the framing.
 www.shutterstock.com www.shutterstock.com
 www.shutterstock.com
 www.shutterstock.com
Read More..
 www.redfin.com ```html
 www.homebazaar.com www.redfin.com
 www.drgfl.com
Read More..
 adviceguru.com
 starstoragenc.com
 www.storageunitsdublin.com adviceguru.com
Read More..
 geology.ecu.edu geology.ecu.edu
 www.flickriver.com
 www.sciencephoto.com
Read More..
 infoupdate.org infoupdate.org
 www.boutiquearchitecture.co.nz
 buildgreennh.com
Read More..
 www.urbannorthern.com www.urbannorthern.com
 www.alibaba.com
 www.alibaba.com
Read More..
Step 6: Install the Door Frame the opening for the door and install the door frame. Hang the door using hinges and install the necessary hardware (latch, handle, lock). Ensure the door swings freely and closes securely.
Step 7: Finishing Touches Caulk any gaps or cracks to prevent water from entering the shed. Add trim around the door and windows (if any). Paint or stain the shed to protect it from the elements and give it a finished look. Install shelves or other storage solutions as needed.
Conclusion: Your New Lean-To Shed Congratulations! You have successfully built your own lean-to shed. With proper maintenance, this shed will provide years of reliable storage. Remember to periodically inspect your shed for any signs of damage or wear and make repairs as needed. Enjoy your new storage space! buildblueprint.com  www.wrightsheds.com
 shedsplanskits.com
Read More..
Lean-to Shed Plans
buildblueprint.com Lean To Shed Pricing
www.wrightsheds.com Lean To Shed Design
shedsplanskits.com 
132+ Flat Roof Brick Building
Kamis, 10 Juli 2025
www.shutterstock.com Introduction: Building a Simple Birdhouse A birdhouse offers shelter and nesting opportunities for feathered friends in your backyard. This guide will walk you through constructing a basic birdhouse using readily available materials and simple tools. It's a great project for beginners and can be customized to suit your preferences.
Materials You'll Need: * Untreated lumber (pine, cedar, or redwood are good choices): A single 1x6 or similar board is usually sufficient. * Wood glue * Nails or screws * Sandpaper * Exterior paint or sealant (optional)
Tools Required: * Saw (hand saw or power saw) * Drill with various sized drill bits * Hammer or screwdriver * Measuring tape * Pencil * Clamps (optional but helpful)
Step 1: Cutting the Pieces Carefully measure and cut the wood pieces according to the following dimensions (adjust these to your preference; these are just a suggestion). Use these dimensions for a small birdhouse suitable for wrens or chickadees. * Front: 6 inches wide x 8 inches high * Back: 6 inches wide x 10 inches high (the extra 2 inches will extend past the roof for hanging) * Sides (2 pieces): 6 inches wide x 7 inches high (taper one end of each side piece, cutting at an angle from 7 inches to 5 inches. This creates the roof slope.) * Bottom: 4 inches wide x 6 inches long * Roof (2 pieces): 4 inches wide x 6 inches long
Step 2: Assembling the Box Attach the sides to the bottom using wood glue and nails or screws. Make sure the tapered ends of the side pieces are facing upwards. Next, attach the front and back pieces. Ensure that the bottom is flush with the front and back. Use clamps to hold the pieces together while the glue dries for a stronger bond.
Step 3: Creating the Entrance Hole Using a drill, create an entrance hole in the front piece. The size of the hole depends on the type of bird you want to attract: * 1 1/8 inch hole: Wrens, chickadees * 1 1/2 inch hole: Nuthatches, titmice Position the hole approximately 2 inches from the top of the front piece. Sand the edges of the hole to prevent splinters.
Step 4: Attaching the Roof Attach the roof pieces to the top of the birdhouse using wood glue and nails or screws. Ensure that the roof overhangs the front and sides slightly to provide protection from the rain.
Step 5: Adding Drainage and Ventilation Drill a few small drainage holes (approximately 1/4 inch) in the bottom of the birdhouse to prevent water from accumulating. Also, drill a couple of small ventilation holes near the top of the sides to keep the birdhouse cool.
Step 6: Sanding and Finishing Sand all the edges and surfaces of the birdhouse to remove any rough spots or splinters. This is important for the safety of the birds. Apply an exterior paint or sealant to protect the birdhouse from the elements. Choose a light or neutral color to avoid overheating. Avoid using bright colors or intricate designs, as these may deter birds.
Step 7: Hanging the Birdhouse Drill a hole through the extended portion of the back piece. Use a sturdy wire, rope, or chain to hang the birdhouse from a tree branch or post. Choose a location that is sheltered from strong winds and direct sunlight. Make sure it is away from predator access (cats or squirrels).
Conclusion: Enjoy Your Birdhouse Congratulations! You've built a simple birdhouse. Place it in your yard and enjoy watching the birds move in. Remember to clean out the birdhouse annually, usually in late winter or early spring, to prepare it for the next nesting season.
Exterior Brick Building Flat Roof Large Stock Photo 1399577843
www.shutterstock.com Panorama Exterior Brick Building Flat Roof Stock Photo 1400663066
www.shutterstock.com Abandoned Brick Building Flat Roof Small Stock Photo 1992303335
www.shutterstock.com 72+ Flat Roof Edge Design
Rabu, 09 Juli 2025
www.redfin.com ```html Introduction: Adding a Professional Edge to Your Flat Roof A clean, well-designed edge on a flat roof isn't just about aesthetics; it's crucial for weatherproofing and directing water away from your building. This guide provides a step-by-step approach to creating a simple, yet effective, flat roof edge using readily available materials. This method focuses on a basic drip edge design suitable for smaller structures or sheds. Remember to consult local building codes and consider professional advice for larger or more complex projects. Safety is paramount; wear appropriate safety gear, including eye protection and gloves.
Materials and Tools You'll Need: Before starting, gather all necessary supplies. Proper preparation saves time and frustration. Treated Lumber: Sufficient length for your roof's perimeter (2x4 or 2x6, depending on your overhang preference) Drip Edge Flashing: Aluminum or galvanized steel, again sufficient to cover your roof perimeter Roofing Nails or Screws: Appropriate for securing lumber and flashing Sealant: Waterproof sealant for creating watertight joints Measuring Tape Pencil or Marker Saw: Circular saw or hand saw for cutting lumber Hammer or Drill/Driver Tin Snips or Metal Shears: For cutting the drip edge flashing Safety Glasses Gloves
Step 1: Measuring and Cutting the Lumber Accurate measurements are critical. Measure the perimeter of your flat roof where you want the edge to be installed. This measurement will determine the length of the treated lumber you need. Cut the lumber to the appropriate lengths using your saw. For a clean and professional finish, miter the corners at a 45-degree angle. Mitered corners will join to create seamless 90-degree angles at each corner of the roof.
Step 2: Installing the Lumber Frame Position the cut lumber around the perimeter of the roof, ensuring it is flush with the edge of the roof deck. Use roofing nails or screws to secure the lumber to the roof structure. Ensure the lumber is securely attached and level. Pay close attention to the corners, making sure the mitered edges align properly. Apply sealant along the joint where the lumber meets the roof deck to prevent water infiltration.
Step 3: Measuring and Cutting the Drip Edge Flashing Measure the length of each section of the lumber frame. Add a few extra inches to each measurement for overlap at the corners. Using tin snips or metal shears, cut the drip edge flashing to the appropriate lengths. Wear gloves while handling the flashing to protect your hands from sharp edges.
Step 4: Installing the Drip Edge Flashing Position the drip edge flashing over the lumber frame, ensuring it overhangs the roof deck slightly to direct water away. Secure the flashing to the lumber using roofing nails or screws. Space the fasteners evenly along the flashing, approximately every 6-12 inches. Overlap the flashing at the corners to create a watertight seal. Seal the corners where the flashing overlaps with sealant.
Step 5: Final Sealing and Inspection Apply a bead of sealant along the top edge of the drip edge flashing where it meets the lumber frame. This will further prevent water from seeping under the flashing. Inspect all seams and joints for any gaps or imperfections. Apply additional sealant as needed. Ensure the drip edge is securely attached and that water will flow freely away from the roof.
Conclusion: Protecting Your Flat Roof Installing a drip edge on your flat roof provides essential protection against water damage. By following these steps, you can create a durable and aesthetically pleasing edge that will help prolong the life of your roof. Remember to regularly inspect your roof edge for any signs of damage or wear and tear, and address any issues promptly. For complex or large-scale roofing projects, consulting with a qualified roofing professional is always recommended.
``` Main Differences Between Flat & Apartment Every Homebuyer Should Know
www.homebazaar.com What Is A Flat?
www.redfin.com What Is A Flat?
www.drgfl.com 79+ Storage Shed Base Kit
Selasa, 08 Juli 2025
adviceguru.com Introduction: Creating a Solid Foundation for Your Shed Building a shed starts from the ground up, literally. A sturdy base is essential for preventing moisture damage, ensuring level floors, and extending the life of your shed. While concrete slabs are excellent, they can be costly and permanent. This guide walks you through building a DIY gravel shed base, an economical and well-draining alternative.
Materials and Tools You'll Need Before you begin, gather the necessary supplies: Crushed gravel (enough to create a 4-6 inch deep base) Road base or compacted gravel (for the bottom layer optional but recommended) Landscape fabric (weed barrier) 4x4 or 6x6 pressure-treated lumber (for the perimeter frame) Construction screws or galvanized nails Level Measuring tape Shovel Rake Tamper or plate compactor Safety glasses Work gloves Circular saw (or hand saw)
Step 1: Prepare the Ground Start by clearing the area where you'll build the shed base. Remove all vegetation, topsoil, and debris. Dig down approximately 6-8 inches to accommodate the gravel and lumber frame. This helps prevent the base from becoming a tripping hazard. Ensure the area is roughly level using a shovel.
Step 2: Build the Perimeter Frame Cut the pressure-treated lumber to create a frame that matches the dimensions of your shed. Assemble the frame using construction screws or galvanized nails. Ensure the corners are square by measuring the diagonals (they should be equal). Place the frame on the prepared ground. Use a level to ensure the frame is perfectly level in all directions. Adjust as needed by adding or removing soil beneath the frame.
Step 3: Add Road Base (Optional) This step is highly recommended for enhanced stability and drainage. Spread a layer of road base (compacted gravel) approximately 2-3 inches thick inside the frame. Use a rake to distribute it evenly. Compact the road base using a tamper or plate compactor. This creates a solid foundation for the gravel layer.
Step 4: Lay Landscape Fabric Cover the entire area inside the frame with landscape fabric. This prevents weeds from growing up through the gravel and helps to maintain the integrity of the base over time. Overlap the edges of the fabric by several inches and secure it to the frame with staples or nails if desired.
Step 5: Add and Level the Crushed Gravel Pour the crushed gravel into the frame, spreading it evenly with a rake. Aim for a depth of 4-6 inches. Use a level to check the surface and ensure it is flat and even. Add or remove gravel as needed to achieve a level surface.
Step 6: Compact the Gravel Thoroughly compact the crushed gravel using a tamper or plate compactor. This will create a stable and solid base for your shed. Compact the gravel in multiple passes, ensuring even compaction across the entire surface.
Conclusion: A Solid Foundation for Years to Come Congratulations! You've successfully built a gravel shed base. This sturdy and well-draining foundation will help protect your shed from moisture damage and ensure its longevity. Allow the base to settle for a few days before building your shed on top of it. Remember to periodically check the base for settling and add more gravel as needed to maintain a level surface.
How To Pick The Right Storage Unit.
starstoragenc.com Storage Units In Dublin
www.storageunitsdublin.com Understanding Storage Units
adviceguru.com 146+ Tuff Shed New Orleans
Jumat, 04 Juli 2025
geology.ecu.edu Opening: Unleash Your Inner Carpenter: Building a Simple DIY Birdhouse Ready to attract feathered friends to your backyard? Building a birdhouse is a fun and rewarding project that can be completed in a weekend with basic tools and materials. This guide will walk you through the steps of creating a simple yet functional birdhouse. Let's get started!
Materials You'll Need: Before diving in, gather the following items:
- A piece of untreated lumber (pine or cedar are good choices) – approximately 1" x 6" x 6 feet
- Wood glue
- Nails or screws
- Sandpaper
- Exterior paint or stain (optional)
- Drill with various sized drill bits
- Saw (hand saw, circular saw, or miter saw)
- Measuring tape
- Pencil
Step 1: Cut the Wood Using the measurements below, cut the lumber into the following pieces. Note that the dimensions may vary slightly depending on the size of birdhouse you prefer, feel free to adapt. These are approximate for a small to medium-sized bird.
- Front: 6" wide x 8" tall
- Back: 6" wide x 10" tall
- Sides (2 pieces): 6" wide x 7" tall (angled cut at the top, see Step 2)
- Bottom: 6" wide x 6" deep
- Roof (2 pieces): 6" wide x 8" deep
Step 2: Angled Cuts for the Sides The sides of the birdhouse need a slight angle to accommodate the roof. On each side piece, measure down 1 inch from the top edge at the back and draw a line diagonally to the top of the front edge (6" mark). Cut along this line with your saw to create the angled roof slope on both side pieces.
Step 3: Drilling the Entrance Hole On the front piece, mark the center point about 2 inches down from the top. Use a drill bit that's appropriate for the birds you want to attract. A 1 1/2" hole is good for wrens, while a larger hole might attract bluebirds. Sand the edges of the hole smooth to prevent injury to the birds.
Step 4: Assembling the Birdhouse Begin by attaching the sides to the bottom. Apply wood glue to the edges of the bottom piece and then nail or screw the side pieces into place, creating a box. Next, attach the front piece, again using glue and nails/screws. Then, attach the back piece. Make sure everything is square and aligned correctly before the glue dries.
Step 5: Attaching the Roof Apply wood glue to the top edges of the sides, front, and back. Position the roof pieces so they overhang slightly on all sides. Secure them with nails or screws.
Step 6: Sanding and Finishing Once the glue is dry, sand down any rough edges or splinters. If you choose to paint or stain the birdhouse, make sure to use an exterior-grade product that's non-toxic. Avoid painting the inside of the birdhouse. Bright colors may deter birds.
Step 7: Installing the Birdhouse Choose a location for your birdhouse that is sheltered from strong winds and direct sunlight. You can mount it on a pole, a tree, or the side of a building. Make sure it's easily accessible for cleaning, as birdhouses should be cleaned out annually after the nesting season.
Conclusion: A Home for Your Feathered Friends Congratulations! You've successfully built a DIY birdhouse. With a little care and maintenance, your birdhouse will provide a safe and welcoming home for birds in your area for years to come. Enjoy watching the birds move in and raise their families!
Tuff
geology.ecu.edu Volcanic Tuff (near Cripple Creek, Colorado, Usa) 1
www.flickriver.com Tuff
www.sciencephoto.com 156+ Open Flat Roof House
Kamis, 03 Juli 2025
infoupdate.org Introduction: Building a Simple DIY Birdhouse This guide will walk you through the steps to construct a basic birdhouse with a flat roof. It's a great project for beginners and can be customized to attract specific types of birds. Remember to prioritize bird safety throughout the construction process. We'll cover material selection, cutting, assembly, and finishing.
Step 1: Gather Your Materials and Tools Before you begin, make sure you have all the necessary materials and tools. This will streamline the building process and prevent interruptions. Here's a list of what you'll need: Untreated wood (pine, cedar, or redwood are good choices avoid treated lumber as it can be harmful to birds) a single 1x6 board about 6 feet long should be sufficient for a small house Measuring tape Pencil Saw (hand saw, circular saw, or jigsaw) Drill with drill bits (various sizes, including one for the entrance hole size depends on the desired bird species) Screws or nails (exterior grade) Sandpaper (medium grit) Optional: Wood glue (exterior grade) Optional: Non-toxic paint or stain (exterior grade, light colors are best)
Step 2: Cut the Wood Pieces Using the measuring tape and pencil, mark the following dimensions onto your wood. These dimensions are suggestions for a general-purpose birdhouse; feel free to adjust them based on your preferences. Ensure all cuts are straight and accurate for a snug fit. Front: 6 inches wide x 8 inches high Back: 6 inches wide x 10 inches high (the extra height provides the roof overhang) Sides (x2): 6 inches wide x 6 inches high (taper the top edge to match the roof angle about a 15-degree angle is good) Bottom: 4 inches wide x 6 inches long Roof: 6 inches wide x 7 inches long Cut each piece carefully using your saw.
Step 3: Assemble the Birdhouse Now it's time to put the pieces together. Start by attaching the sides to the bottom. Use screws or nails to secure them. You can apply wood glue to the edges for added strength. Next, attach the front piece to the sides and bottom. Again, use screws or nails and wood glue if desired. Then, attach the back piece to the sides and bottom, ensuring it extends above the front for the roof overhang. Finally, attach the roof piece to the top of the front, back, and sides. Ensure it overhangs the front slightly to protect the entrance from rain.
Step 4: Drill the Entrance Hole and Ventilation/Drainage The size of the entrance hole is crucial as it determines which bird species can use the birdhouse. Research the appropriate hole size for the birds you want to attract in your area. Drill the entrance hole in the front piece. A common size is 1 1/2 inches for attracting bluebirds. Position the hole about 2 inches from the top. Drill a few small drainage holes (about 1/4 inch) in the bottom of the birdhouse to allow rainwater to escape. Drill small ventilation holes near the top of the sides to provide airflow.
Step 5: Sand and Finish (Optional) Sanding and finishing the birdhouse can protect it from the elements and make it more attractive. Sand all the edges and surfaces of the birdhouse to remove any splinters or rough spots. If you choose to paint or stain the birdhouse, use non-toxic, exterior-grade products and opt for light, natural colors. Avoid dark colors as they can overheat the birdhouse. Also, avoid painting the inside of the birdhouse. Let the paint dry completely before placing it outside.
Step 6: Mounting the Birdhouse Choose a suitable location for your birdhouse. Consider factors such as sun exposure, predator access, and proximity to food and water sources. Mount the birdhouse on a pole, tree, or building. Ensure it is securely attached to prevent it from falling. You can use screws, nails, or brackets. Some prefer to hang birdhouses. In that case, drill holes near the top corners of the back panel to add wire or rope. Consider using a predator guard to protect the birds from cats and other animals.
Conclusion: Enjoy Your DIY Birdhouse Congratulations! You've successfully built a simple DIY birdhouse. Now, sit back and enjoy watching the birds move in. Remember to clean the birdhouse out once a year, after the nesting season, to remove old nests and debris. This will help keep the birdhouse clean and safe for future residents. Happy bird watching!
5 Bedroom Flat Roof House Designs
infoupdate.org Flat Roof House
www.boutiquearchitecture.co.nz 15 Clever Flat Roof House Ideas For Modern Living
buildgreennh.com 85+ Pine Shavings From Chicken Coop In Garden Safe
Rabu, 02 Juli 2025
www.urbannorthern.com Introduction: Pine Shavings from Chicken Coop to Garden Gold Transforming used pine shavings from your chicken coop into valuable garden amendment is a fantastic way to recycle waste, improve your soil, and reduce your environmental impact. This guide provides a simple, step-by-step approach to safely and effectively incorporating coop waste into your garden ecosystem. This method focuses on composting the shavings and manure to avoid nitrogen burn and ensure the beneficial breakdown of organic matter.
Materials Needed: Used pine shavings and chicken manure from your coop A compost bin or designated composting area Watering can or hose Pitchfork or shovel Optional: Brown materials like leaves, straw, or shredded paper Optional: Compost thermometer
Step 1: Preparing the Compost Bin Choose a suitable location for your compost bin. It should be easily accessible, preferably in a shady area to prevent the compost from drying out too quickly. Ensure good airflow around the bin or pile. If you're using a purchased compost bin, follow the manufacturer's instructions. If creating a compost pile directly on the ground, clear the area of weeds and debris.
Step 2: Layering the Compost Begin by creating a base layer of "brown" materials. This could be dried leaves, straw, shredded paper, or even cardboard. The purpose of the brown materials is to provide carbon, which is essential for the composting process and helps to balance the nitrogen-rich chicken manure. Add a layer of the pine shavings and chicken manure mixture.
Step 3: Maintaining Moisture and Aeration Water the compost pile thoroughly after each layer is added. The compost should be damp, like a wrung-out sponge. Avoid overwatering, which can lead to anaerobic conditions and foul odors. Turn the compost pile regularly (every week or two) using a pitchfork or shovel. This aerates the pile, providing oxygen for the microorganisms that break down the organic matter.
Step 4: Monitoring the Composting Process Use a compost thermometer to monitor the temperature of the pile. Ideally, the compost should reach temperatures between 130°F and 160°F (54°C and 71°C) to kill pathogens and weed seeds. If the temperature doesn't rise, the pile may need more nitrogen (add more manure) or moisture. If the temperature is too high, add more brown materials or turn the pile more frequently.
Step 5: Curing the Compost Once the compost has stopped heating up and the materials are no longer easily recognizable (this typically takes several months), it's time to cure it. Move the compost to a separate pile or bin and let it sit for an additional few weeks. This allows the beneficial microbes to finish breaking down the remaining organic matter and stabilize the compost.
Step 6: Using the Compost in Your Garden The finished compost will be dark, crumbly, and earthy-smelling. You can use it as a soil amendment by mixing it into garden beds before planting. It can also be used as a top dressing around existing plants or as a potting mix for containers. Always test your compost before widespread use to ensure pH levels are adequate.
Conclusion: Sustainable Gardening with Chicken Coop Waste By following these steps, you can safely and effectively transform used pine shavings and chicken manure into valuable garden compost. This sustainable practice not only reduces waste but also enriches your soil, promotes healthy plant growth, and contributes to a more environmentally friendly gardening approach. Remember to monitor your compost pile and adjust your methods as needed for optimal results.
Fresh Flakes
www.urbannorthern.com Pine Shavings For Chicken Coop Bedding 100% Natural Wood Shavings For
www.alibaba.com Pine Shavings For Chicken Coop Bedding 100% Natural Wood Shavings For
www.alibaba.com
Langganan:
Postingan (Atom)