


 www.structuralbasics.com
 Introduction: Building a Simple DIY Flat Roof Steel Structure This guide will walk you through the process of constructing a small, simple flat roof steel structure, suitable for projects like sheds, workshops, or carports. This design prioritizes ease of construction and affordability. Remember safety first, so wear appropriate safety gear like gloves and eye protection throughout the build. Seek professional help for larger structures or if you are unsure about any aspect of the build. This example is for a small structure (e.g., 8ft x 10ft) – adjust dimensions and steel gauge accordingly for larger projects.
Step 1: Planning and Materials Start with a clear plan. Measure your desired footprint and draw a simple schematic, noting the dimensions of the base, posts, and roof supports. Accuracy is key. Steel Tubing (e.g., 2"x2" square tubing for posts and frame, 1"x1" for purlins) Steel Plates (for post bases and connections) Welding Machine (and associated consumables like welding rods/wire) Angle Grinder with Cutting and Grinding Discs Measuring Tape, Level, Square Drill with Steel Drill Bits Rust-Resistant Paint or Primer Safety Glasses, Welding Gloves, and a Welding Helmet Fasteners (Bolts, Nuts, Washers) Calculate the quantity of each material based on your design.
Step 2: Preparing the Base and Posts Cut the steel tubing for the base frame according to your plan. Weld the corners to create a rectangular or square frame. Ensure the frame is square using a measuring tape and square. Cut steel plates for the post bases. Weld these plates to the bottom of the steel tubes that will serve as posts. Grind down any sharp edges or rough welds for safety and a clean finish. Paint or prime all the steel components before assembly. This will prevent rust and corrosion, especially if your structure will be exposed to the elements.
Step 3: Assembling the Frame Position the base frame on a level surface. If necessary, prepare a concrete foundation to ensure the structure is stable. Place the posts at the corners of the frame, ensuring they are plumb (vertical). Weld the posts to the base frame. Use a level to keep the posts straight. Cut and weld horizontal steel tubing between the posts at the top to create the roof frame. Double-check all welds and ensure the frame is structurally sound.
Step 4: Adding Roof Supports (Purlins) Cut the 1"x1" steel tubing to create purlins (horizontal roof supports). The spacing between the purlins depends on the load-bearing capacity required for your roof. Typically, a spacing of 2-3 feet is sufficient for a small structure. Weld the purlins to the top frame, running parallel to each other. Ensure the purlins are evenly spaced and securely welded. Grind down any sharp edges or rough welds.
Step 5: Finishing and Roofing Apply a final coat of rust-resistant paint or primer to all the steel components. This will provide additional protection against the elements. Choose a suitable roofing material (e.g., corrugated metal sheets, plywood with a waterproof membrane). Attach the roofing material to the purlins using appropriate fasteners (screws, bolts). Ensure the roof is properly sealed to prevent water leaks. Inspect all connections and welds for strength and stability.
Conclusion: Enjoying Your DIY Steel Structure You have now successfully constructed a simple flat roof steel structure! This versatile structure can be used for a variety of purposes. Remember to periodically inspect the structure for any signs of wear and tear, and address any issues promptly. Consider this a starting point, and adapt the design and materials to suit your specific needs and skill level. Always prioritize safety and consult with a professional when needed.
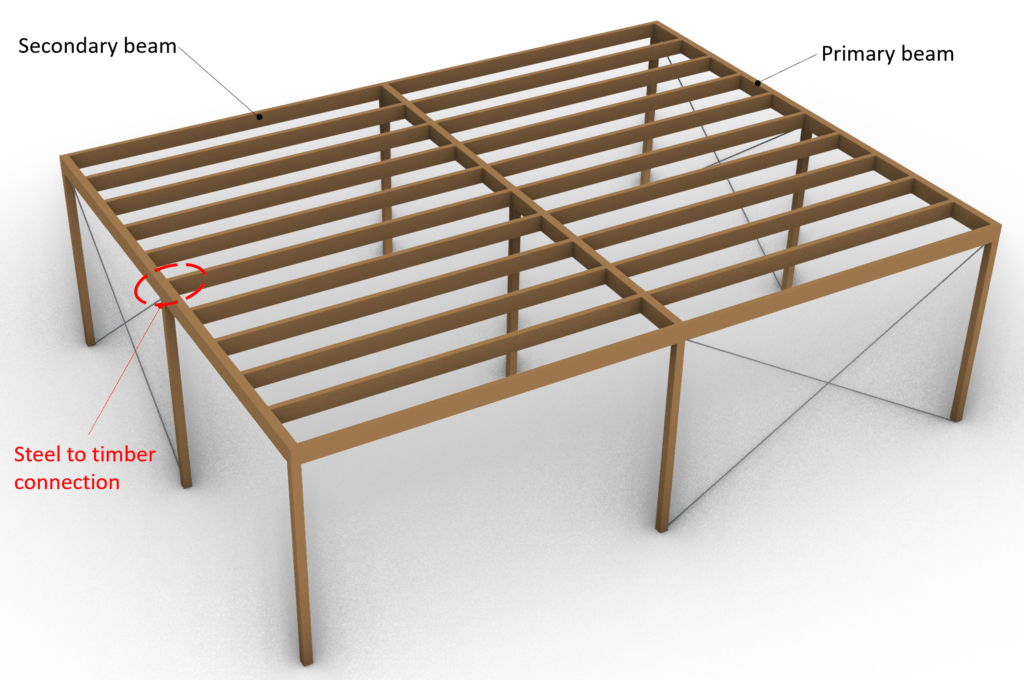
Steel To Timber Connection
www.structuralbasics.com Flat Roof 30 Foot Steel Truss
 www.pinterest.com
 Steel Flat Roof Section Detail
 www.pinterest.com.au

0 komentar:
Posting Komentar